PreparationThis is the final week of the Genius Hour project. Although I am sad that it is over, I am glad I got the experience. It has been fun and challenging. This week I decided to end the project with a painting that Bob Ross normally does not do--a coastal painting. This was an old painting from from season one of his show. I decided to recreate Bob Ross' "Seascape" from Season 1, Episode 9 of The Joy of Painting. This painting features a sunset sky and a weathered fence. Below is the video tutorial for Bob Ross' "Seascape". ProcessLike all of my previous recreations, this painting started off with adding a layer of liquid white to the blank canvas. The next step was creating the sun. Then, I started painting the colorful sky around the sun. Next, I made the clouds and highlighted them with yellow. I then made the ocean water, put the horizon line and made some wave caps. After that, I created the sand and added some brown grass. I made the pool and then started on the weathered fence. Then, I added the tree and created more grass. My final step was adding details and signing my initials. The best part of this painting was making the fence. It was really fun using the palette knife to make this. The hardest part of this painting was creating the water pool and the sand around it. OutcomeThis painting was really fun to recreate. I enjoyed making a scene that was not just grassland and mountains. This project was an overall success for me. I fulfilled my goal of learning how to paint like Bob Ross and mastering his techniques. I also found an enjoyable new hobby that I will continue to do. I am sad that this journey is coming to an end, but I am happy that I learned a new skill. Below is my recreation of Bob Ross' "Seascape". 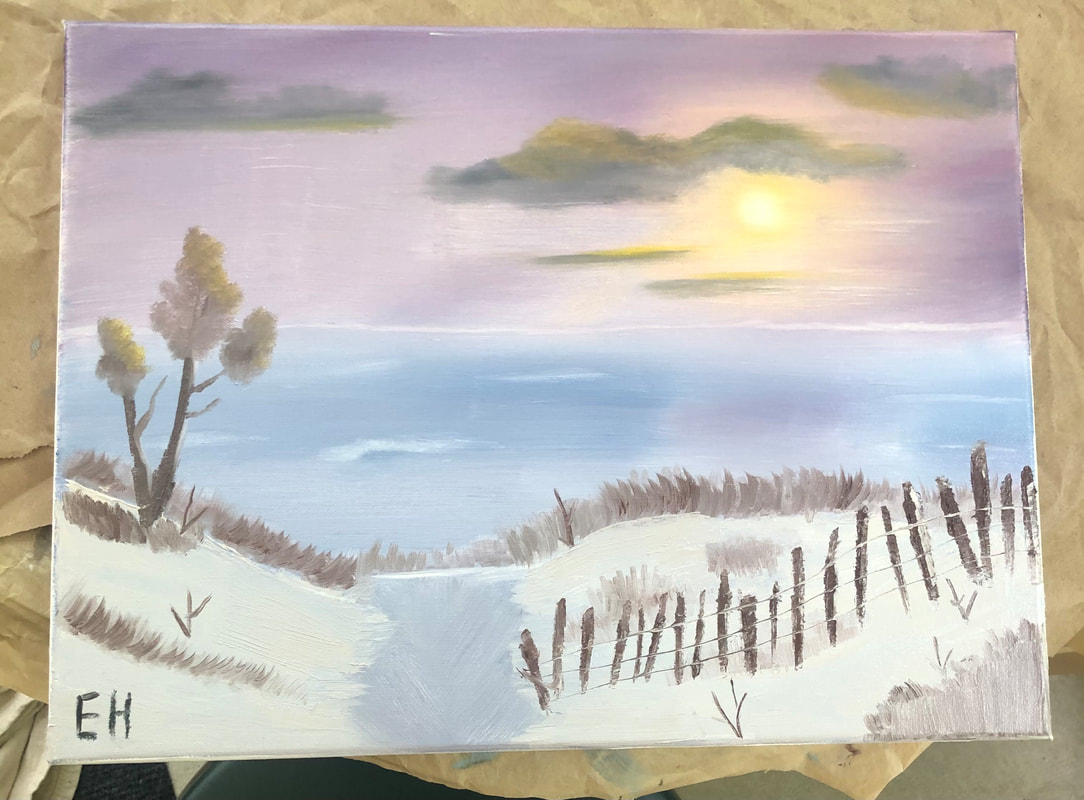
0 Comments
PreparationI was excited to paint this week after taking a break last week. It felt like it had been forever. I decided this week to paint the landscape I was planning on doing last week. The title of the painting is "The Footbridge". The video tutorial is from Season 24, Episode 12 of Bob Ross' The Joy of Painting. This painting features a bridge and woodland areas. Below is the video tutorial for Bob Ross' "The Footbridge". ProcessJust like every other painting, I started off with a liquid white covered canvas. First, I made the sky and water. Next, I made the clouds and the distant trees. Then, I started on the bridge. Making the bridge had many steps such as making the bars, reflections, and posts. After that, I made the evergreen trees and grassy areas. I then highlighted bushes and made the path. My final step was making the naked trees and doing last minute details. This painting was different from my other recreations. This one had a bridge in it. To make the bridge I used the palette knife, which I have struggled using in the past. Making the bridge was not as difficult as I thought it would be. The key is to use light pressure and a steady hand. I have increased my palette knife skills since the start of this project. One thing that I can still improve on is trees. Bob uses a fan brush which is one I do not have so I have to use a one inch brush. This can make it difficult to get the same detail Bob has in his painting. I am still working to master my skill of making happy little trees. OutcomeI had a lot of fun recreating this Bob Ross painting. It was nice doing something new. Next week is week twelve of the Genius Hour project, which is the final week. It is hard to believe it is coming to an end. Below is my recreation of Bob Ross' "The Footbridge". 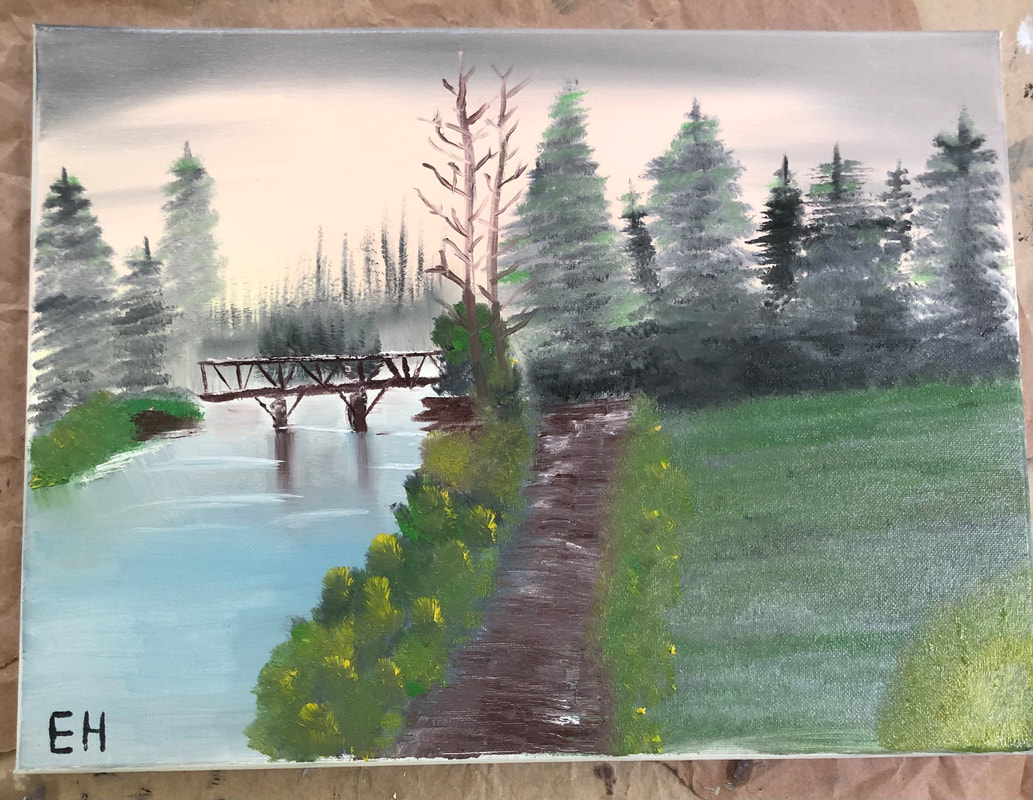 Taking a BreakThis week I was unable to paint a Bob Ross recreation. I usually do my painting on Wednesday but I had a lot going on that day so I decided I would push it back and do it on Thursday. This however did not work out either. On Wednesday, I received my second dose of the COVID-19 vaccination. The next day side effects on Thursday were awful. I was throwing up and achy early Thursday morning and continued to stay in bed the remainder of the day. I decided it would be best to take a week off from painting. Of course I do not regret getting vaccinated, it is important for everyone to do their part. This week I was planning on doing Bob Ross' "The Footbridge" from Season 24, Episode 12 of The Joy of Painting. This landscape included a bridge and woodland areas. I might do this painting next week if I do not find anything else that I like better. As I watch Bob more and more, my liking of him increases. You can tell just from his videos the love he had for others and the compassion he had for our planet. I wish there were more people like him in the world. Even after this project is over, I will continue to watch his video tutorials. Coming to an EndIt is hard to believe that this is week 10 of the Genius Hour project. It is also hard to believe school is almost over. With the weird school year that is going on I am glad I found something enjoyable for me to do. Painting is way more relaxing than I thought it would be. With this project coming to an end, I will keep in mind the presentation that I have to do and start preparing and brainstorming for it.
PreparationThis week I was better prepared going into painting. I researched and decided the day before what Bob Ross landscape I wanted to recreate. After looking at all of Bob Ross' creations, I decided I wanted to do another winter landscape. It has been awhile since I have done a snowy scene, so I thought it was a good idea. I decided on Bob Ross' "Winter Mountain" from Season 12, Episode 13 of The Joy of Painting. Below is Bob Ross' video tutorial for "Winter Mountain". ProcessI started off with a canvas covered in liquid white. First, I painted the blue sky and added a pop of pink. I then started on the ground and water area. Next, I painted the big mountain. After that, I created the snow and shadows on the mountain. This requires a special technique that I have started to master. To do this you use the palette knife and titanium white. The key is to use little to no pressure and outline the mountain shape with the roll of white paint you have on your knife. This creates the texture you see on the mountains. Following that, I created the foothills and evergreens. Then, I created the snowy ground, snow path, and the snowy bushes. I finished by adding last minute details and initialing my name. The hardest part of this painting was creating the snowy bushes. It was important to load my brush with a lot of paint or else it will turn out grey because of the dark trees. I learned this the hard way. OutcomeI like how this painting turned out. It was not very difficult to recreate. I used to not like creating mountain landscapes but now I enjoy doing them. It is very fun to use the palette knife to create the mountains and the details. It is hard to believe it has been 9 weeks since I first started painting like Bob. This project is coming to an end soon. I have to say I am going to miss it when it's over. Below is my recreation of Bob Ross' "Winter Mountain". 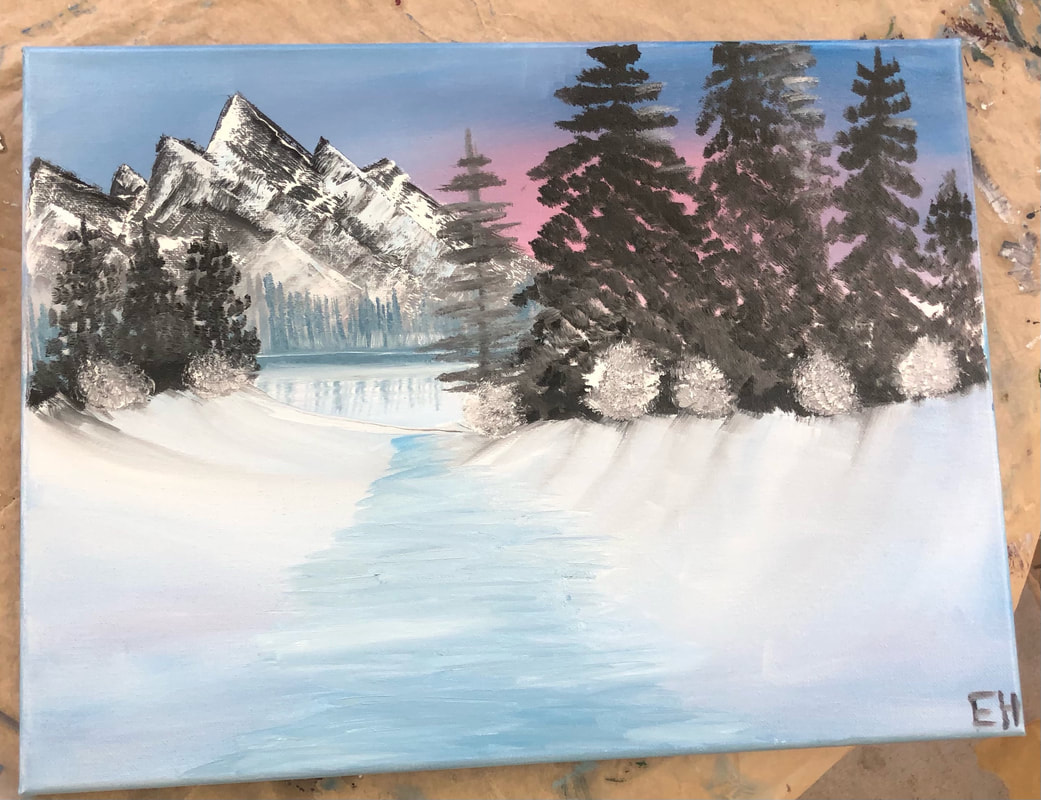 PreparationThis week I struggled to choose a Bob Ross painting to recreate. I was stuck. I had no idea which tutorial I wanted to follow. After reflecting upon the different options I had, I decided to do another sunset landscape. I chose to do another sunset painting because I loved the way it looked last time. I like using colorful oil paints. It is fun to add pops of color and not just use greens and blues all the time. This week I followed season 28 episode 3 of Bob Ross' The Joy of Painting. This painting is titled "Under Pastel Skies". Below is video tutorial for Bob Ross' "Under Pastel Skies". ProcessThis painting started out like all of the others, applying a thin coat of liquid white. After doing that, I started on the sunset sky and the water. Then, I started making the distant mountains and foothills. Next I made the big mountain and the trees and bushes. I added my own twist making a walkway at the bottom of the painting. Finally I added details and signed my initials. I messed up while recreating this painting. If you watch the video tutorial, there was supposed to be a grassy bank with rocks. When trying to make the rocks, I could not get the technique right. It just looked like a brown mess. I also could not get the grass technique right. This forced me to make my own twist on the painting. Instead of making rocks, I used my messed up attempt and made a pathway. Instead of making the grassy bank, I added colorful bushes and flowers. OutcomeAfter having to take a different route than Bob, I realized that it is okay to not follow the tutorial step by step. It is good to be different and add your own touches. Overall, the painting did not turn out terrible. Next week I am going to be better prepared so I do not get caught up trying to figure out which tutorial I should follow. Also, a little tip- don't pour paint thinner in a solo cup unless you want to burn a hole through the bottom of it. Below is my recreation of Bob Ross' "Under Pastel Skies". 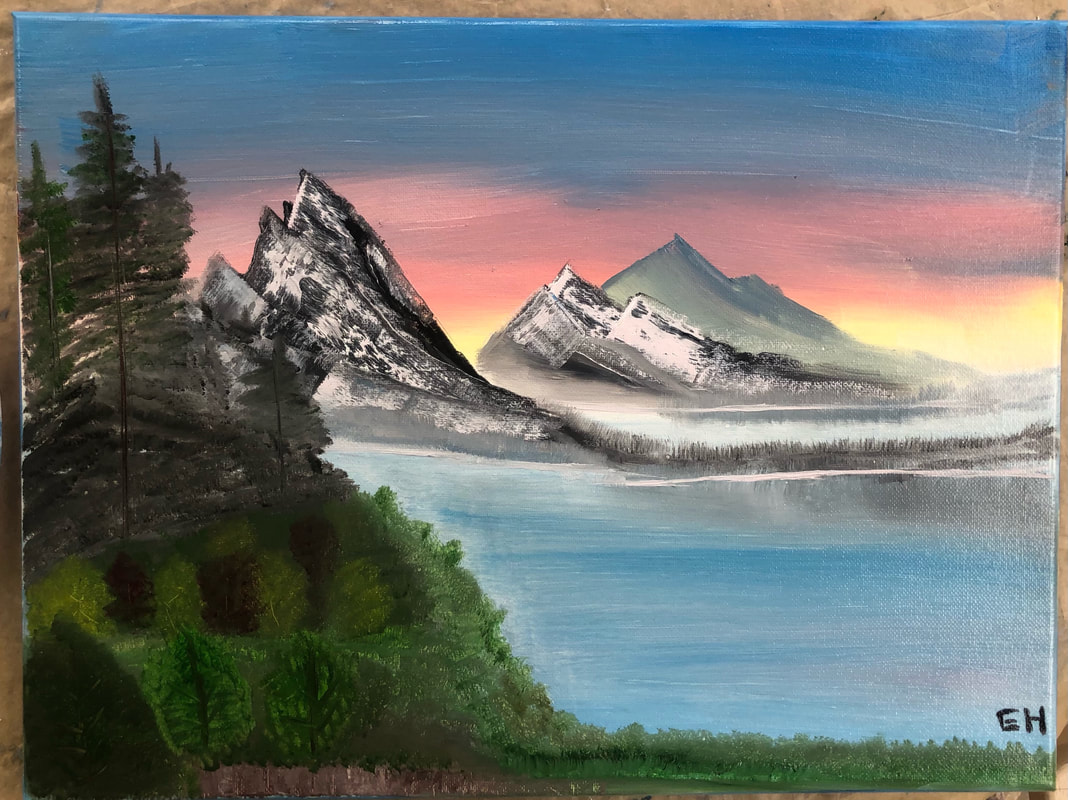 PreparationFor this week's painting, I wanted to do something I have not done yet--a sunset painting. I wanted to do a sunset landscape because I wanted to use brighter colors. After researching the different sunset paintings Bob Ross has done, I decided to go with season 24, episode 1 of The Joy of Painting. The title of this painting is "Grey Mountain". Below is Bob Ross' video tutorial for "Grey Mountain". ProcessI started off with a canvas covered in liquid white. My first step was making the sky and water. Then, I started making the mountains and foothills. Next, I made the bigger trees and river banks. After that, I made the reflections and added bushes. I finished by adding small details. The hardest part of this painting was creating the reflections on the water from the trees and bushes. I found it difficult trying not to mix the darker colors with the vibrant colors. If I would have done this, it would have looked like a weird brown mess and not reflections. ProgressCompared to my previous week's paintings, I feel that my skills are improving. I feel more confident while painting. I know how to work with oil paints and how to create different things using various painting utensils. I also feel like I am painting faster compared to previous weeks. I am thankful that this project has created a new hobby for me. My friends and family enjoy my paintings as much as I do. They think that they are great. I am going to give some of my paintings to them. Some of my previous creations are hanging around my house. It is nice to know that others like my masterpieces. OutcomeI think that this Bob Ross recreation came out very pretty. I love the bright colors that were used. This was a very fun and enjoyable painting to recreate. Below is my recreation of Bob Ross' "Grey Mountain". 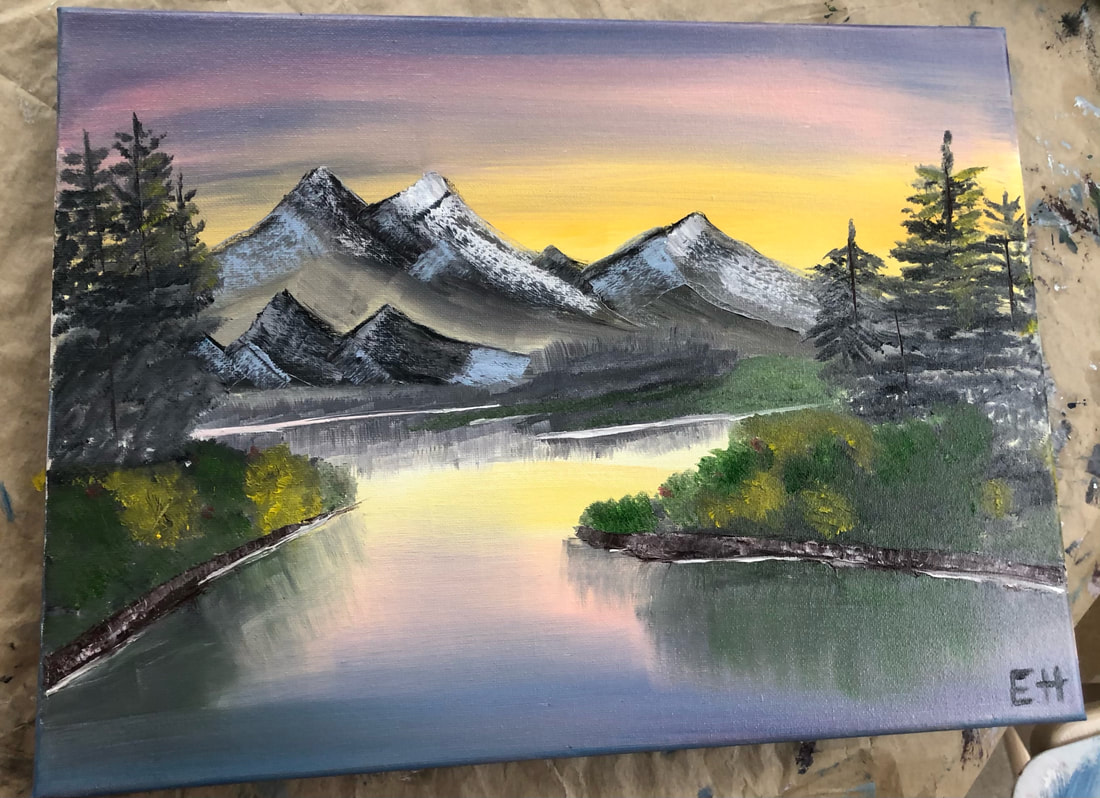 Half Way ThereThis week marks the halfway point of the Genius Hour project. So far I have had fun and learned a lot. After completing five different Bob Ross paintings, I can see myself continuing to paint in the future. Not only have I learned a new skill, but I have created a new hobby. I am excited for what the next six weeks of this project holds. PreparationThis week my goal was to recreate a painting that used the palette knife since I need to increase my skills on this technique. After doing research, I found a tutorial that used the knife to create mountains. This was similar to the technique used in my first week's painting. The tutorial I decided to follow was season 14, episode 1 of The joy of Painting by Bob Ross. The title of this painting is "Distant Mountains". Below is Bob Ross' video tutorial for "Distant Mountains". ProcessLike all of the other paintings I have recreated, my first step was to prep the canvas with a coat of liquid white. Then I started creating the sky and water. After that, I created the clouds and started on the mountains. Next, I created the foothills and made reflections into the water. I then painted the trees and made the bushes. After that, I created the pathway on the bottom of the painting. My final step was adding highlights and pops of colored flowers. Using the palette knife in this recreation was not as challenging as it was in previous paintings. I feel like I am getting better at mastering the technique. I find using the palette knife a fun and creative way to add details and objects to a painting. I felt very relaxed while recreating this tutorial. I was not rushed today since I did not have any other activities to do. It was also raining which made it better. Listening to Bob's soothing voice and the calming noise of the rain, what more could you want? It was like a personal therapy session. OutcomeBelow is my recreation of Bob Ross' "Distant Mountains". I am proud of how this painting turned out. This week's painting was very relaxing and fun to recreate.  HaulAfter many weeks of using pieces of cardboard as a paint palette, I decided it was time to purchase one. The palette I purchased at the start of this project was way too small. I did not have enough space to mix my colors on it so I had to use pieces of cardboard. This was quite challenging since the cardboard would soak up some of the oil paint. The palette I purchased is flat and big. This makes it easier for me to mix paint colors. I also purchased two more oil paint colors: sap green and crimson. Along with the paint and palette I got six more 12x16 canvas'. Below is a picture of the items I purchased this past week. 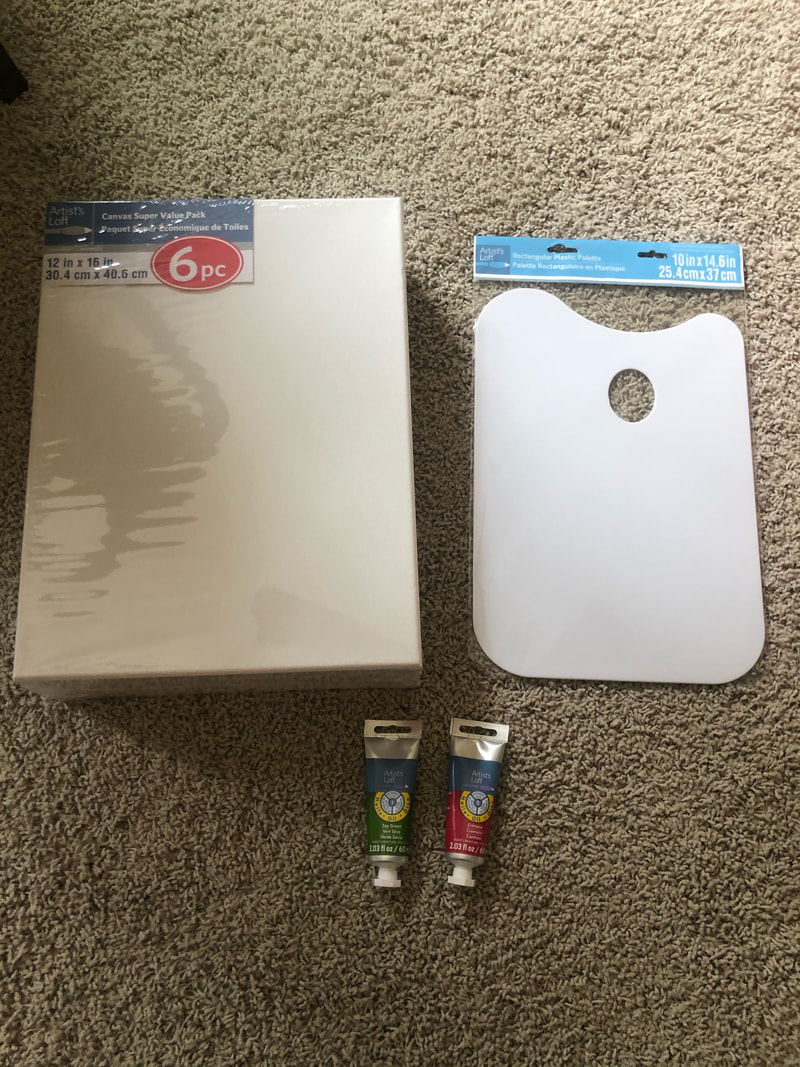 PreparationThis week I wanted to recreate a painting with a little more color in it. After researching paintings by Bob that had more color in them I decided to go with season 26 episode 5 of The Joy of Painting by Bob Ross. The title of this painting is "A Trace of Spring". This painting seemed more challenging than last weeks and also included more color in it. I was looking forward to recreating this painting since spring is coming up. Below is the video tutorial for Bob Ross' "A Trace of Spring". ProcessLike the other paintings I have recreated, I started off by adding a layer of liquid white to my canvas. I then started off making the blue sky. After that I made the clouds and began on the dark water. Then I started creating the distant trees, river banks, and the forest. Following that I added the pops of color, highlights, and details. Finally, I created the bush on the side and signed my initials. The most challenging part of recreating Bobs paintings is mastering the palette knife technique he uses. In this particular painting he used the knife to create the river banks and the water highlights. I found this quite challenging to do. I ended up having to do some of the things Bob painted with a knife using a brush. Next week I hope to find a video tutorial that uses his knife technique. This is a skill that I need to strengthen. OutcomeBelow is my recreation of Bob Ross' "A Trace of Spring". Overall my painting is not terrible. I still need to paint more in order to strengthen my skills and get better.  PreparationI was struggling to find time to do my painting this week. Balancing other school work, practices, and this Genius Hour project can be challenging. However, I did find a window of time to do my painting. I did not do much research on what Bob Ross painting to do this week. After browsing through some of his tutorial options, I settled on recreating season 5, episode 5 of The Joy of Painting. The title of this painting is called "Quiet Pond". I decided on this tutorial because it was different from the mountain and winter scene I did in the previous weeks. Below is season 5, episode 5 of The Joy of Painting by Bob Ross ProcessAfter a minute or two into watching the video tutorial, I knew this painting was going to be difficult. Bob used many different shades of green in this painting and I only had one of them-uh oh. I am always up for a challenge so I decided I would create my own colors. I mixed medium yellow with oxide of chromium (green) to make a yellow-green color. I did the same with titanium white to make a lighter green shade. I also mixed van dyck brown with oxide of chromium to make a woodsy green color. After creating the colors, I began to paint. First, I covered the canvas in liquid white and created the sky. After making the sky I created the background trees. I then made the water and added reflections. Next I made the grass and added details. Then I painted the big tree on the side of the painting. Lastly, I made more details and did finishing touches This was the hardest painting I have recreated so far. I struggled making depth in my painting. It was hard using greens and browns and not making it look like a complete mess. This tutorial was not as easy to follow compared to previous weeks. I found myself getting stressed while painting. I was having trouble getting the colors how I wanted them. They ended up not being as bright as I would have liked. OutcomeI was not happy with how this weeks painting turned out. However, it is a learning experience. I am still learning how to properly create depth and color in paintings. Next week I hope to better manage my time and continue strengthening my skills. Below is my recreation of Bob Ross' "Quiet Pond" 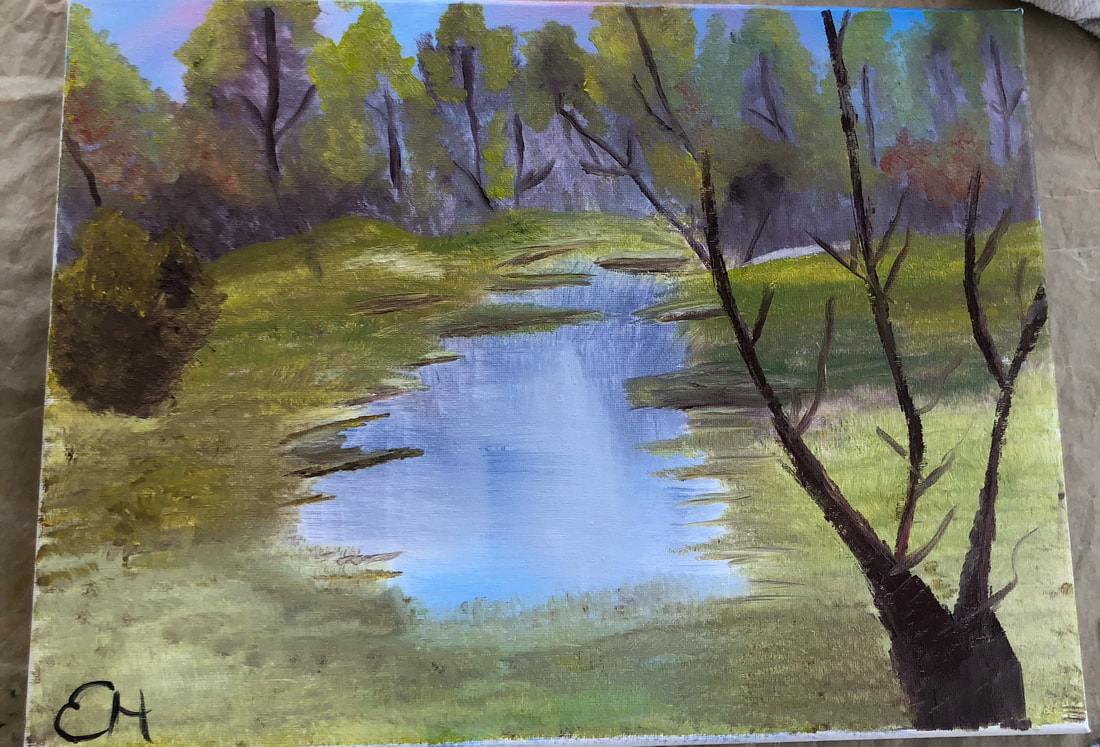 PreparationI was really excited to paint this week. I was looking forward to recreating another one of Bob's landscapes. After looking into a couple of different options of what tutorial to follow this week, I picked season 7 episode 11 of The Joy of Painting. The title of this painting is Grey Winter. I picked this tutorial because it was quite different from my first painting. Last week's painting was a summer scene. This week's painting is a winter scene. I also chose this video because it was still on the easier side of Ross' tutorials. Below is the video tutorial for the painting "Grey Winter". Season 7, Episode 11 of The Joy of painting by Bob Ross: ProcessThis tutorial was quite different from my last. This tutorial was roughly 30 minutes while the tutorial I followed last week was an hour. I found myself stopping, pausing, and rewinding way more than last week. Although Bob went fast, I had no difficulties following his techniques. Bob is really good at explaining what he does. This painting only required 3 colors- black, white, and red. Although I did not have the exact same red and black color that Bob used, I was still able to recreate his landscape with what I had. The oil paints I used were bright red, titanium white, and lamp black. For this painting the canvas was turned vertical rather than horizontal. To start, I put a coat of my homemade liquid white all over the canvas. Then I started making the stormy sky. This part was difficult for me. I had a hard time creating depth within my sky. I would blend the colors together and it would end just being a grey mess. However, I ended up working through my issue and doing the best I could. After creating the sky I used the same brush without dipping into any more paint, and started creating the land. I then started creating foothills and trees. After that, I started creating hills and details. I then created water using reflections from the trees. Next, I made the evergreen tree on the side of the painting. Lastly I created bushes, added snowy details, and made last minute finishing touches. ComparisonGoing into this weeks painting, I felt more confident. As I was painting I felt more comfortable than I did the previous week. This painting only took me an hour and a half while my last recreation took me two and a half hours. Overall, I am happier with this week's painting. I feel like my work and details are better. I think my skills have approved since first starting this project. However, I know I can get better. OutcomeBelow is my recreation of Bob Ross' "Grey Winter". I am proud of my work. I had lots of fun this week and I cannot wait for my next Bob Ross masterpiece. 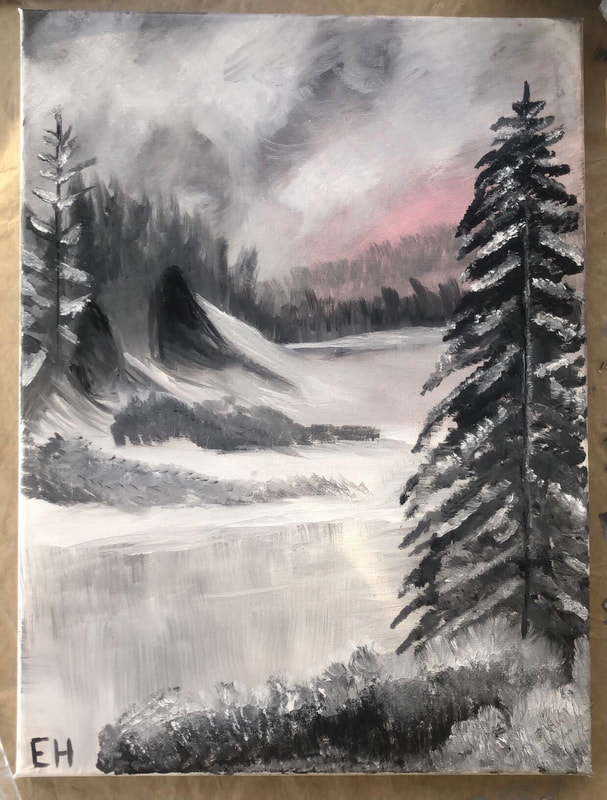 Here is my workspace after I finished my creation. Cleaning up is the worst part. 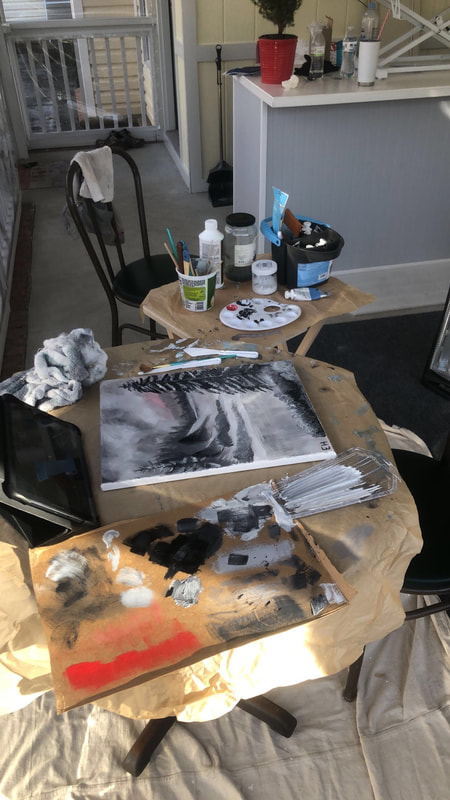 |
AuthorHello, my name is Emma Hayes and I am a sophomore at Davie County High School. I love to play volleyball and learn new things. Archives |
 RSS Feed
